If you’re renovating your kitchen or building a new one, understanding the basics of kitchen plumbing rough in is crucial. From the height of the sink drain to the placement of supply lines, getting it right ensures proper functionality and prevents future headaches. In this comprehensive guide, we’ll delve into all the important details, including the rough in heights for bathroom and kitchen sink drains, the positioning of sink drain pipes, and more. So grab your tools and let’s get started on creating the perfect plumbing setup for your kitchen!
The Basics of Kitchen Plumbing Rough In
So you’re embarking on a kitchen remodeling adventure, and it’s time to go deep into the world of kitchen plumbing rough in. This crucial step sets the stage for all the plumbing fixtures and appliances that will inhabit your new culinary wonderland. But fear not, my fellow foodies, for I am here to guide you through this maze of pipes and fittings with ease and a sprinkle of humor.
What is Kitchen Plumbing Rough In
Let’s start with the basics. The term “rough in” refers to the initial installation of the plumbing infrastructure before the walls and floors are finished. In the context of kitchen plumbing, rough in involves positioning the water supply and drain pipes in the right places to accommodate sinks, faucets, dishwashers, and any other plumbing fixtures you desire.
Mapping Out Your Dream Kitchen
Before you can dive into the nitty-gritty of rough in, you need a plan. Grab that trusty measuring tape and sketch out your dream kitchen layout. Consider the location of your sink(s), dishwasher, refrigerator with ice maker, and any additional water sources you may desire, like a pot-filler faucet for those gourmet endeavors.
Determining Pipe Sizes
Now that you’ve visualized your kitchen paradise, it’s time to determine the proper pipe sizes. They say the bigger, the better, but that’s not always true in the world of plumbing. Pipe size must be chosen carefully to ensure optimal water pressure and proper drainage. Consult a plumbing professional or refer to local building codes to determine the correct pipe sizes for your specific kitchen plumbing needs.
Supply Lines: Bringing Water to the Party
Ah, the supply lines. These magnificent conduits bring that precious H2O to your kitchen sink. Copper, PEX, or good ol’ PVC – the choice is yours. Just make sure they’re properly installed and provide adequate water flow to avoid any unpleasant surprises during your dishwashing adventures.
Drainage: Moving Water Out and Away
Now, let’s talk drainage. Nobody wants a clogged sink or standing water ruining their cooking mojo. Make sure your rough in includes the correct slope for drainage pipes, so water flows freely toward the sewer or septic system. And don’t skimp on those handy-dandy traps and vents that keep the stinky stuff from infiltrating your kitchen.

Future-Proofing: Think Beyond Today
When tackling kitchen plumbing rough in, it’s wise to think ahead. Consider potential future needs and trends. Installing a water line for a future refrigerator with an ice maker or a gas line for a gas range might save you headaches and money down the road. So put on your fortune-teller cap and plan ahead, my visionary friend.
And there you have it, my kitchen aficionados. The basics of kitchen plumbing rough in are no longer a mystery. Armed with this knowledge, you can fearlessly venture into the realm of remodeling, knowing that your plumbing infrastructure will be solid and dependable. So go forth, design your dream kitchen, and let the water flow with perfect precision!
Bathroom Sink Drain Height
When it comes to installing a bathroom sink, one important aspect to consider is the drain height. The proper height of the drain ensures optimal functionality and prevents any potential plumbing issues down the line. In this section, we will dive into the details of bathroom sink drain height and everything you need to know.
Why Does Drain Height Matter
Having the correct drain height is essential for efficient drainage and to avoid any water backup. If the drain is too high, water will not flow properly, leading to slow drainage or even overflow. On the other hand, if the drain is too low, you might find yourself bending over uncomfortably to reach the sink.
Standard Bathroom Sink Drain Height
The standard height for a bathroom sink drain typically ranges from 18 to 30 inches from the floor. However, there is some flexibility based on personal preference and specific bathroom design. This standard height provides optimal drainage while allowing for easy accessibility.
Factors to Consider
Style of the Sink
Different sink styles require different drain heights. For undermount sinks, the drain height needs to be lower to accommodate the sink’s depth and to maintain a streamlined look. Vessel sinks, on the other hand, sit on top of the countertop, so the drain height needs to be higher to accommodate their raised position.
User Comfort
Consider the height of the people who will be using the bathroom sink regularly. Ideally, the height should be comfortable for the tallest person in the household. This ensures that using the sink is convenient for everyone, with no unnecessary bending or straining.
Local Building Codes
Always check your local building codes and regulations regarding plumbing rough-in before finalizing the drain height. Building codes may have specific requirements that you need to adhere to, ensuring compliance and safety.
Adjusting Drain Height
If you find that the existing drain height is not suitable, don’t worry! There are a few ways to adjust it. One option is to use an extension pipe to lower or raise the drain height. Another option is to hire a professional plumber who can make the necessary adjustments to ensure optimal functionality.
Getting the bathroom sink drain height right is crucial to prevent any future plumbing problems and ensure a comfortable experience. Remember to consider factors like sink style, user comfort, and local building codes when determining the ideal drain height. By focusing on the details, you can ensure a well-functioning bathroom sink that meets your needs perfectly.
Vanity Drain Rough-In Height
When it comes to plumbing in your kitchen, one important aspect to consider is the rough-in height of the vanity drain. This refers to the positioning of the drain pipe during the early stages of construction or renovation, before the actual installation of the vanity. Getting the rough-in height right is crucial to ensure proper functionality and avoid any future plumbing headaches.
Importance of Vanity Drain Rough-In Height
The rough-in height of the vanity drain determines the location where the drain pipe connects to the main plumbing system. It’s vital to get this height correct to ensure that your vanity will align properly with the drain pipe, allowing for a seamless installation. If the rough-in height is too low or too high, it can cause issues with the vanity installation, making it difficult to connect the drain pipe or leading to leaks and drainage problems.
Determining the Correct Vanity Drain Rough-In Height
To determine the appropriate rough-in height for your vanity drain, you’ll need to consider a few factors. First, check the local plumbing codes in your area, as they may specify a specific height requirement. Additionally, consider the type of vanity you’ll be installing and consult the manufacturer’s guidelines for any specific requirements or recommendations.
Typically, the rough-in height for a vanity drain is around 18 inches from the finished floor. However, this can vary depending on factors like the vanity style, sink depth, and your personal preference. It’s always a good idea to consult with a professional plumber to ensure you’re choosing the correct rough-in height for your specific situation.
Tips for Achieving the Right Rough-In Height
When determining the rough-in height, take into account the countertop thickness and sink depth you plan to use. This will help you calculate the correct rough-in height, ensuring that the drain will align properly with the sink’s trap.
To make things easier during the installation process, consider marking the desired rough-in height on the wall studs before plumbing work begins. This will provide a clear reference point and ensure accurate positioning.
Getting the vanity drain rough-in height correct is essential for a successful kitchen plumbing project. By considering local codes, manufacturer recommendations, and your specific needs, you can determine the optimal rough-in height that will allow for a hassle-free vanity installation and efficient functioning of your kitchen plumbing system. Always consult with a professional plumber for expert guidance and assistance throughout the process.
Kitchen Sink Supply Line Height
When it comes to kitchen plumbing rough-ins, one important element to consider is the height of the kitchen sink supply line. This crucial detail can make a huge difference in the functionality and aesthetics of your kitchen. In this section, we’ll explore everything you need to know about the kitchen sink supply line height.
Why is the Kitchen Sink Supply Line Height Important
The kitchen sink supply line height determines the distance between the countertop and the top of the water supply valves. It’s essential to get this right to ensure proper water flow and prevent any potential leaks. A well-placed supply line ensures convenient access to the valves while keeping them hidden and out of sight, adding to the overall look and feel of your kitchen.
Finding the Ideal Height
To determine the ideal kitchen sink supply line height, you need to consider several factors. Firstly, think about the average height of the people using your kitchen sink regularly. It’s always a good idea to aim for a height that allows for comfortable access to the valves.
Standard kitchen sink supply lines are typically installed around 8-10 inches above the countertop. However, this can vary depending on personal preferences and other factors, such as the type of faucets you’re using. If you have a unique situation or want to deviate from the average height, it’s best to consult a professional plumber to ensure the best results.
Tips for Installing the Supply Line
When installing the kitchen sink supply line, it’s important to keep a few tips in mind. Firstly, ensure that the supply line is correctly positioned and securely connected to avoid any issues down the line. Additionally, consider using flexible supply lines to make installation easier and more convenient.
It’s also worth mentioning that if you’re remodeling your kitchen or installing a new sink, it’s an excellent opportunity to update your supply lines. This will not only ensure optimal functionality but also enhance the overall visual appeal of your kitchen.
Remember, attention to detail is key when it comes to kitchen plumbing rough-ins. Taking the time to properly determine the kitchen sink supply line height will undoubtedly contribute to a well-designed, functional, and beautiful kitchen space.
To Sum It Up
The height of your kitchen sink supply line plays a significant role in the overall look and functionality of your kitchen. By considering factors such as accessibility and personal preferences, you can determine the ideal height for your specific needs. When installing the supply line, focus on accuracy and securing the connections. And if you’re remodeling, take the opportunity to upgrade your supply lines. With careful planning and expert installation, you’ll have a kitchen that not only looks great but works beautifully too.
Kitchen Sink Rough-in Through Floor
Introduction
When it comes to kitchen plumbing rough-ins, one important aspect to consider is the rough-in for the kitchen sink. This is the foundation of your kitchen plumbing system, and getting it right is crucial for a smooth and efficient flow of water. In this section, we will explore the process of roughing in a kitchen sink through the floor, covering everything from planning to installation.
Preparing for the Rough-in
Before you start roughing in your kitchen sink through the floor, it’s essential to have a clear plan in mind. Measure the dimensions of your sink and choose a suitable location on the floor. Consider factors like proximity to water lines, drain pipes, and electrical connections. Also, take into account any necessary permits or building codes you need to comply with.
Marking and Cutting
Once you have planned the location, mark the area on the floor with a pencil or masking tape. It’s crucial to be accurate, as even a slight miscalculation can lead to significant headaches later on. Once you’ve marked the spot, use a reciprocating saw or a drill with a hole saw attachment to cut a hole in the floor. Take care when cutting to avoid damaging any existing pipes or wires underneath.
Installing the Drain Assembly
With the hole cut, it’s time to install the drain assembly for your kitchen sink. Start by attaching the drain flange to the sink basin – make sure it’s properly sealed with plumber’s putty or silicone. From underneath the sink, connect the PVC trap adapter to the drain flange, creating the connection between the sink and the drain pipe. Secure the connections tightly but avoid overtightening, as it can lead to leaks.
Running the Water Supply Lines
Next, it’s time to run the water supply lines to your kitchen sink. Measure and cut the copper or PEX pipes to the appropriate length, ensuring they reach the new rough-in location. Use a pipe cutter for clean and precise cuts. Connect the water supply lines to the faucet valves using compression fittings or sweat fittings, depending on the type of pipes you are using. Ensure that all connections are tight and leak-free.
Roughing in a kitchen sink through the floor may seem like a daunting task, but with careful planning and attention to detail, it can be successfully accomplished. By following the steps outlined in this section, you can ensure a sturdy and reliable foundation for your kitchen plumbing system. Remember, if you’re unsure about any part of the process, it’s always best to consult a professional plumber who can provide guidance and expertise. Happy plumbing!
What is the Rough In for Kitchen Plumbing
When it comes to kitchen plumbing, understanding the concept of rough in is crucial. Picture this: you’re renovating your kitchen, and you need to install new plumbing lines. But before you can install those shiny pipes and fixtures, you need to know where they should go and how they connect to the existing systems. That’s where the rough-in process comes in!
The Basics of Rough In
Rough in is basically the initial stage of plumbing installation, where the necessary pipes and fittings are installed within the walls and under the floors before the actual fixtures go in. It’s like setting up the backstage infrastructure for a theatrical performance – everything that’s hidden from view but essential for the show to go on smoothly.
Finding the Right Locations
During the rough-in phase, plumbers map out the ideal locations for various components, such as sinks, faucets, dishwasher lines, and water supply pipes. They make sure these components are strategically positioned to ensure efficient water supply and drainage. It’s like a perfectly choreographed dance where each step has its designated place.
Measuring and Cutting Pipes
Once the locations are determined, it’s time for some pipe action! Plumbers measure and cut the pipes to the correct lengths, ensuring a precise fit for each connection. It’s like a game of connect-the-dots, but instead of drawing lines, you’re joining pipes to create the perfect plumbing puzzle.
Joining the Pipes Together
With the pipes cut, plumbers proceed to join each piece together using various fittings like elbows and couplings. This process creates a sturdy and watertight network of pipes, ensuring smooth water flow and preventing any leaks. It’s like creating a masterpiece with Lego blocks – each piece perfectly interlocking to form a solid structure.
Testing the Waters
After all the pipes are connected, the moment of truth arrives: testing the system to ensure everything works as it should. Plumbers turn on the water supply and check for any leaks, ensuring that the water flows freely and there are no surprises hiding behind the walls. It’s like running a dress rehearsal before the big performance – making sure that everything runs smoothly without any unexpected mishaps.
The Final Act
Once the rough-in is completed and everything has been thoroughly tested, it’s time for the final act: installing the fixtures and putting the finishing touches on your kitchen plumbing. With the rough-in in place, the stage is set for a functional and efficient kitchen that can handle all your culinary needs!
Remember, understanding the rough-in process is essential for any kitchen plumbing project. It ensures that your plumbing system is properly installed, preventing future headaches and unexpected surprises. So next time you’re admiring your beautifully remodeled kitchen, take a moment to appreciate the hidden magic of the rough-in process.
What Height Should a Sink Drain Be Rough In
When it comes to the rough-in for a sink drain, getting the height just right is essential for a properly functioning plumbing system. So, what is the ideal height for a sink drain rough-in? Let’s dive into the details.
Understanding the Basics
Before we determine the perfect height, it’s important to understand the basics of a sink drain rough-in. The rough-in refers to the initial installation of the plumbing system before fixtures are added. This includes determining the positions of the drain, water supply lines, and other necessary components.
Factors to Consider
Several factors come into play when deciding the height of a sink drain rough-in. First and foremost, you need to consider the specific type of sink you’ll be installing. Different sinks have different drain configurations, so it’s crucial to choose the right height based on the sink’s design.
Additionally, you should consider factors such as local building codes and regulations. These codes may stipulate specific requirements for drain heights, ensuring compliance and safety.
Ideal Height Range
While the height may vary slightly depending on the factors mentioned above, a general rule of thumb for sink drain rough-in height is between 18 and 20 inches. This height range ensures that the drain is easily accessible for maintenance purposes while also preventing any potential issues with water flow.
Adjusting for Personal Preference
Of course, everyone has their own preference when it comes to the height of their sink drain. Some people may prefer a slightly higher or lower drain to accommodate their specific needs. As long as it doesn’t violate any building codes, you can customize the height based on personal preference.
Working with Professionals
If you’re unsure about the appropriate height for your sink drain rough-in or want to ensure compliance with building codes, it’s always best to consult with a professional plumber. They have the expertise and knowledge to guide you through the process, ensuring that your plumbing system is set up correctly.
When it comes to the height of a sink drain rough-in, it’s crucial to find the right balance between accessibility, functionality, and personal preference. By considering the type of sink, building codes, and consulting with professionals, you can achieve the ideal height for a smooth-running plumbing system in your kitchen. So, go ahead and enjoy a hassle-free sink experience!
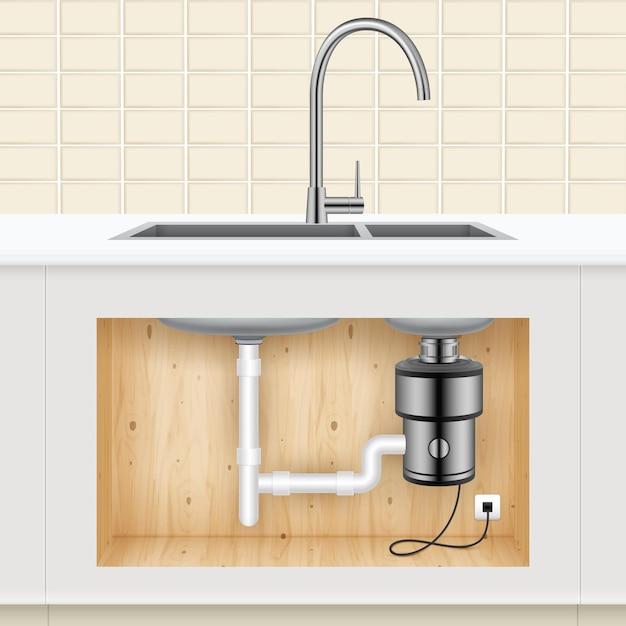
Kitchen Sink Drain Rough-In Height with Garbage Disposal
In the thrilling realm of kitchen plumbing rough-in, one particular subtopic that deserves our attention is the height at which the drain for the kitchen sink, especially when accompanied by a garbage disposal unit, should be roughed in. Let’s dive right in and explore the ins and outs of this crucial aspect.
Understanding the Basics
When it comes to the rough-in height of a kitchen sink drain with a garbage disposal, it’s essential to consider both functionality and safety. The aim is to strike a balance that allows for efficient drainage while ensuring adequate space for the garbage disposal unit to be installed and maintained.
The Recommended Height
Ideally, the rough-in height of the kitchen sink drain should fall within the range of 18 to 20 inches. This measurement ensures that there is ample space for the installation of the garbage disposal unit below the sink, while also accommodating the necessary plumbing connections.
Factors to Consider
Several factors come into play when determining the precise rough-in height for your kitchen sink drain with a garbage disposal. These factors include the specific model of the garbage disposal unit, the height of your kitchen cabinets, and even your personal preference for the sink’s depth.
Adjusting for Your Needs
If you find that the rough-in height suggested by standard measurements doesn’t quite fit your requirements, don’t despair! Plumbing is a versatile craft that allows for customization. You can work with a professional plumber to adjust the height accordingly, ensuring both functionality and aesthetic appeal.
Tips for Smooth Drainage
To promote smooth drainage and prevent clogs when dealing with a kitchen sink drain paired with a garbage disposal, consider incorporating these simple tips:
1. Proper Food Waste Disposal
Remember to only dispose of appropriate food waste in the garbage disposal unit. Avoid putting fibrous or greasy items down the drain, as they can lead to clogs and unpleasant odors.
2. Regular Maintenance
Perform routine maintenance on your garbage disposal unit to keep it running smoothly. This includes running cold water while operating the disposal, cleaning it with vinegar and baking soda, and occasionally sharpening the blades.
3. Handling Minor Clogs
If you encounter a minor clog, don’t panic! Try using a plunger or a combination of hot water, baking soda, and vinegar to clear the blockage. If the problem persists, it’s advisable to seek professional assistance.
A Perfect Balance
Selecting the appropriate rough-in height for your kitchen sink drain with a garbage disposal is akin to achieving a harmonious dance between practicality and aesthetics. By considering the recommended measurements and factoring in your personal needs, you can ensure a smooth and efficient plumbing experience in your kitchen. And remember, even amidst the world of pipes and drainage, it never hurts to double down on good food hygiene and disposal practices – keep those drainpipes flowing freely!
How Far Should Your Kitchen Sink Drain Pipe Be from the Wall
When it comes to kitchen plumbing rough-in, one of the common questions that homeowners often ask is, “How far should my kitchen sink drain pipe be from the wall?” Well, fear not, my fellow kitchen enthusiasts, for I am here to shed some light on this important matter!
The Ideal Distance: Striking the Perfect Balance
To ensure optimal function and ease of use, it is generally recommended to place your kitchen sink drain pipe approximately 12 inches away from the wall. This distance allows enough room for maneuvering and maintenance while also preventing any potential issues with the drain pipe being too close or too far.
The Dangers of Being Too Close
If your kitchen sink drain pipe is placed too close to the wall, it can make accessing the pipe for repair or cleaning a real nightmare. Nobody wants to tap dance around cabinets and squeeze in tight spaces whenever a plumbing issue arises. By leaving a comfortable gap, you’ll save yourself from unnecessary frustration down the road.
The Perils of Being Too Far
On the other hand, if the kitchen sink drain pipe is set too far away from the wall, you might encounter a different set of problems. For instance, under-sink storage can be compromised, leaving you with limited space for all your dazzling kitchen gadgets. Plus, who wants to stare at a big gap between the sink and the wall? Let’s keep it aesthetically pleasing, folks!
Flexibility is Key
Of course, there may be specific circumstances where the ideal distance of 12 inches doesn’t quite fit the bill. Plumbing is an art, and sometimes it requires creative solutions. If you’re faced with a unique kitchen layout or other restrictions, don’t fret! Just be sure to consult a professional plumber who can evaluate your situation and find the perfect compromise between function and design.
When it comes to determining how far your kitchen sink drain pipe should be from the wall, remember that balance is key. Aim for roughly 12 inches of space to ensure ease of maintenance without compromising storage or aesthetics. And when in doubt, don’t hesitate to seek the guidance of a plumbing expert. With these tips in mind, you’ll be well on your way to a beautifully functional kitchen sink setup. Happy plumbing!